Storm Damage Roof Repair: The Complete Homeowner's Guide (2026)

Shocking Industry Truth
A storm just hit your area. Shingles are scattered across the yard, there is water dripping from the ceiling, and your neighbor's tree is leaning against your roof. What do you do first?
In my years repairing storm-damaged roofs, I have seen homeowners make costly mistakes in the hours and days after a storm -- mistakes that void insurance coverage, lead to further damage, or result in hiring a contractor who disappears after cashing the insurance check. This guide exists so you do not make those mistakes.
Every year, storms cause billions of dollars in roof damage across the United States. According to NOAA, the U.S. averaged 18 separate billion-dollar weather disasters annually from 2019 through 2024. Whether you are dealing with hurricane-force winds on the coast, baseball-sized hail in the Midwest, tornado damage in the Plains, or ice dam destruction in the Northeast, the process for getting your roof properly repaired follows the same critical steps.
This is the guide I wish every homeowner had before calling their insurance company or answering the door for a storm chaser. It covers everything: what to do immediately after a storm, how to identify different types of damage, the insurance claim process from start to finish, how to choose a legitimate contractor, and how to protect your roof from the next storm.
Key Takeaways
- 1. Safety first, always. Never get on a storm-damaged roof yourself. Conduct your initial assessment from the ground and from inside the attic.
- 2. Document everything before touching anything. Take photos and video of all damage before making any temporary repairs -- your insurance claim depends on it.
- 3. File your insurance claim within 24 to 48 hours. Most policies have strict filing deadlines, and delays give insurers reasons to reduce or deny your claim.
- 4. Never sign anything with a storm chaser. Legitimate roofing contractors do not go door-to-door after storms offering to "handle everything" or waive your deductible.
- 5. Get an independent contractor estimate before the adjuster visit. Having a professional damage assessment ensures the adjuster does not miss damage that is not visible from the ground.
- 6. Understand repair vs. replacement. Not every storm-damaged roof needs full replacement -- but some that look repairable actually do.
Need immediate help with a storm-damaged roof? Call (843) 877-5539 for a free inspection.
If you are in the Myrtle Beach, SC area and need local-specific guidance, see our storm damage roof repair guide for Myrtle Beach which covers South Carolina-specific insurance laws, building codes, and contractor recommendations.
Ready to Protect Your Investment?
Schedule your free roof inspection today. No obligations, just peace of mind.
What to Do Immediately After a Storm Damages Your Roof
The first 24 to 48 hours after storm damage are the most critical. What you do -- and what you avoid doing -- during this window directly impacts your safety, your insurance claim, and the long-term integrity of your home. Here is the step-by-step process I walk every homeowner through.
Step 1: Ensure Everyone Is Safe
Before you even think about your roof, make sure everyone in the home is safe. If there is structural damage, downed power lines near the house, or gas leaks, evacuate and call 911. Do not re-enter the home until authorities confirm it is safe.
Safety Warning
Never climb onto a storm-damaged roof. Structural integrity may be compromised even if the roof looks intact from the ground. Wet surfaces, hidden damage to decking, and displaced materials create fall hazards that injure thousands of homeowners every year. Leave roof access to licensed professionals with proper safety equipment.
Step 2: Protect the Interior of Your Home
If water is entering your home, take immediate steps to minimize interior damage:
- Place buckets or containers under active leaks
- Move furniture, electronics, and valuables away from water intrusion areas
- Lay down plastic sheeting or tarps over flooring and belongings that cannot be moved
- Turn off electricity to any rooms where water is contacting wiring or outlets
These are considered "reasonable steps to mitigate further damage" -- which is actually a requirement in most homeowner insurance policies. Your insurer expects you to prevent additional damage after the initial event. Failing to do so can reduce your claim payout. For more on handling active leaks, see our complete guide to roof leak repair.
Step 3: Document Everything Before Touching Anything
This is the step most homeowners skip -- and it costs them thousands. Before you clean up debris, before you attempt any temporary repairs, and before you call anyone, document the damage thoroughly.
How to Photograph Storm Damage for Insurance Claims
- Wide shots first: Photograph the entire roof from multiple angles showing the overall scope of damage
- Then close-ups: Get detailed photos of every damaged area -- missing shingles, dents, cracks, lifted flashing
- Interior damage: Water stains on ceilings, wet walls, damaged belongings
- Contextual evidence: Photos of downed trees, debris fields, damaged neighboring homes
- Video walkthrough: Record a narrated video walking around the exterior and through any damaged interior areas
- Timestamp everything: Ensure your camera has the correct date and time. Take a photo of a newspaper with the date visible if needed
- Include a reference object: Place a coin, pen, or ruler next to hail dents or damage for scale
Store photos in at least two places -- your phone and a cloud backup service. Insurance claims can take weeks or months, and losing your documentation is losing your leverage.
Step 4: Contact Your Insurance Company Within 24 to 48 Hours
Most homeowner insurance policies require prompt notification of damage. While specific deadlines vary by state and policy, filing within 24 to 48 hours establishes the strongest claim position. When you call:
- Get a claim number and write it down
- Ask about your policy limits, deductible type (standard vs. named storm/wind-hail), and coverage type (RCV vs. ACV)
- Ask about the timeline for adjuster assignment and inspection
- Document the call: Date, time, representative name, and what was discussed
For a detailed walkthrough of the entire insurance claim process, see our guide to getting insurance to pay for roof replacement and our roof inspection for insurance claims guide.
Step 5: Call a Licensed Roofing Contractor
Contact a licensed, insured roofing contractor in your area before the insurance adjuster arrives. A reputable contractor will perform a thorough inspection, document damage the adjuster might miss, and provide an independent estimate that strengthens your claim.
Expert Insight
"In my experience, insurance adjusters spend an average of 30 to 45 minutes on a roof inspection. A thorough contractor inspection takes two to three hours. That difference often translates to thousands of dollars in damage that gets documented on the contractor's report but missed on the adjuster's. Having both reports gives you leverage if the initial payout is too low." -- David Karimi, WeatherShield Roofing
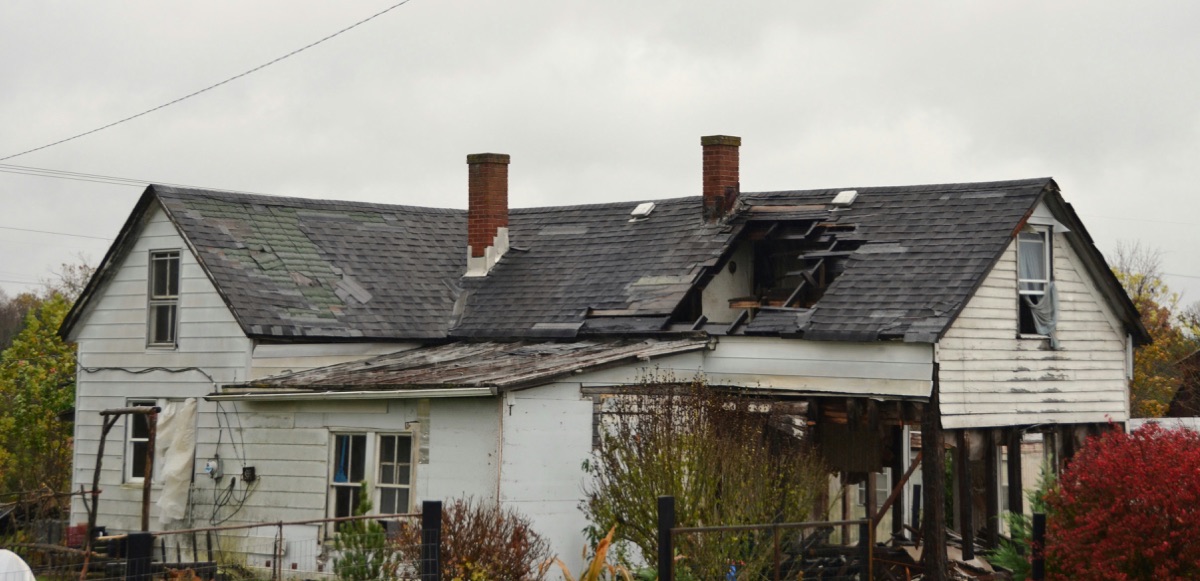
Types of Storm Damage to Roofs
Not all storm damage looks the same, and different types of storms create different damage patterns. Understanding what type of damage your roof has sustained helps you communicate effectively with your insurance company and contractor, and ensures that all damage is identified and addressed.
Wind Damage
Wind damage is the most common type of storm damage to roofs in the United States. It can occur in any storm with sustained winds above 45 mph or gusts above 60 mph.
What wind damage looks like:
- Missing shingles -- blown completely off the roof, often found in the yard or street
- Lifted or curled shingle tabs -- the adhesive seal broke and tabs are raised
- Creased shingles -- shingles that folded over and then laid back down, often with a visible crease line
- Exposed underlayment or decking -- bare spots where shingles were removed
- Damaged ridge caps -- the capping along the roof peak is particularly vulnerable to uplift
- Lifted or displaced flashing -- metal flashing around chimneys, vents, and valleys pulled away
Severity levels: Minor wind damage (a few missing shingles) can often be repaired. Extensive wind damage across more than 30 percent of the roof surface typically warrants full replacement. Wind damage is often worst on the side of the roof facing the prevailing wind direction and at edges, eaves, and ridges where uplift forces are strongest.
Hail Damage
Hail damage is deceptive. It can be severe enough to require full roof replacement while being nearly invisible from the ground. This is why professional inspection is essential after any hailstorm.
What hail damage looks like:
- Random pattern dents in shingles -- unlike wind damage, hail strikes are scattered randomly across the roof
- Loss of granules -- dark spots where the protective granule layer has been knocked off, exposing the asphalt mat
- Soft spots when you press on the shingle -- the fiberglass mat beneath the granules is cracked or broken
- Dented gutters, downspouts, and vent caps -- often the most visible evidence of hail
- Cracked or broken skylights
- Dented metal flashing around penetrations
Severity levels: Hail smaller than one inch in diameter (about the size of a quarter) may cause cosmetic damage that does not immediately affect roof function but degrades the shingle lifespan. Hail larger than one inch typically causes functional damage that requires repair or replacement. Hail larger than two inches (golf ball size and up) almost always causes damage severe enough to require full roof replacement.
Hurricane and Tropical Storm Damage
Hurricanes and tropical storms combine multiple damage mechanisms simultaneously: sustained high winds, wind-driven rain, flying debris, and sometimes tornadoes spawned within the storm system. This creates the most complex and severe roof damage scenarios.
What hurricane damage looks like:
- Widespread shingle loss across the entire roof, not just one face
- Structural damage to decking -- plywood or OSB panels lifted or broken
- Soffit and fascia destruction -- wind-driven rain enters through the eaves
- Debris impact damage -- punctures from flying objects (branches, building materials, signage)
- Water intrusion through wind-driven rain even in areas where shingles remain intact
- Gutter system damage or complete removal
If you are in a coastal area, our hurricane roof damage guide covers the specific challenges of post-hurricane recovery.
Tornado Damage
Tornado damage is often the most devastating but also the most localized. A tornado can destroy one house completely while leaving the house next door untouched.
What tornado damage looks like:
- Complete or partial roof removal -- entire sections of roofing structure ripped away
- Debris embedded in the roof -- boards, branches, and other objects puncturing through roofing materials and decking
- Twisted or displaced structural members -- rafters, trusses, and ridge beams shifted or broken
- Wall separation from the roof structure -- the roof-to-wall connection failed
- Pressure damage -- rapid air pressure changes can push the roof upward from the inside
Severity: Tornado damage almost always requires significant repair or complete replacement. Even areas of the roof that appear undamaged should be inspected, as the structural connections may have been weakened.
Heavy Rain and Water Damage
While rain alone does not typically damage a sound roof, heavy or prolonged rain can exploit existing vulnerabilities that a storm has created or worsened.
What rain/water damage looks like:
- Water stains on ceilings or walls -- brown or yellow rings indicating water penetration
- Pooling water on flat or low-slope roofs -- caused by blocked drainage or structural sagging
- Gutter overflow damage -- gutters overwhelmed by volume, causing water to sheet down walls and into the foundation
- Valley erosion -- the concentrated water flow in roof valleys strips away granules and degrades materials faster
Fallen Tree and Debris Impact Damage
What it looks like:
- Punctures or holes in the roof surface and potentially through the decking
- Crushed or collapsed roof sections under the weight of fallen trees
- Fractured rafters or trusses from impact force
- Displaced gutters and fascia from limb impact
Important: Do not attempt to remove a tree or large limb from your roof yourself. The tree may be providing structural support to the damaged area. Removing it improperly can cause further collapse. A professional tree removal service working in coordination with a roofing contractor is the safe approach.
Ice Dam and Snow Load Damage
In northern climates, ice dams and heavy snow loads are significant sources of roof damage.
What ice dam damage looks like:
- Water intrusion along the eaves -- water backs up behind the ice dam and seeps under shingles
- Damaged or displaced gutters -- the weight of ice pulls gutters away from the fascia
- Shingle deterioration along the eave line -- repeated freeze-thaw cycles degrade the roofing material
- Interior water damage in exterior walls -- water running behind the wall sheathing
- Sagging roof structure under heavy snow load -- especially on flat or low-slope sections
How to Inspect Your Roof for Storm Damage
A thorough post-storm inspection follows a systematic process that covers the exterior from ground level, the interior and attic, and all roof-connected systems. You can and should do the ground-level and interior portions yourself. Leave the on-roof inspection to a professional.
Ground-Level Exterior Inspection
Walk the entire perimeter of your home with your phone camera recording. Look for:
- Shingles or roofing material on the ground -- note where they appear to have come from
- Visible damage to the roof surface from the ground using binoculars
- Damaged siding, fascia, or soffits -- these often indicate roof-level wind forces
- Dented or crushed gutters and downspouts -- especially after hailstorms
- Fallen tree limbs on or near the roof
- Damaged or leaning satellite dishes, antennas, or vent pipes
- Debris accumulation in valleys or against walls
Interior and Attic Inspection
Check inside the home for signs of roof damage:
- Water stains or wet spots on ceilings, especially in upper-floor rooms and around light fixtures
- Dripping or active leaks during or after rain
- In the attic: Look for daylight visible through the roof boards, wet insulation, water tracks on rafters, or new dark stains on the underside of the decking
- Musty or damp odor in the attic -- indicates moisture that may not be visible yet
Gutters, Downspouts, and Drainage
- Granule accumulation in gutters -- excessive granules (more than normal shedding) indicates hail or severe weather damage to shingles
- Dented or bent gutter sections
- Downspouts detached or misaligned
- Splash blocks or drain extensions displaced
Chimneys, Skylights, and Penetrations
- Cracked or displaced chimney cap
- Damaged or missing chimney flashing -- visible gaps between chimney and roof
- Cracked or shattered skylight glass
- Bent or damaged plumbing vent boots
- Damaged satellite dish mounting hardware -- can create new leak points
How to Photograph Damage for Insurance Claims
Documentation Photography Checklist
- Establish context: Wide shots showing the entire roof from each compass direction
- Show the damage pattern: Medium shots showing clusters of damage across a roof section
- Detail the specifics: Close-up shots of individual damage points (missing shingles, dents, cracks)
- Include scale references: Place a coin, ruler, or golf ball next to hail dents for size comparison
- Capture collateral evidence: Damage to gutters, siding, AC units, window screens, vehicles -- anything that corroborates the storm event
- Record video: Walk around the property narrating what you see. Video captures context that photos miss
- Photograph your address: Include a shot showing your house number or mailbox for undeniable location proof
- Save weather reports: Screenshot radar images, severe weather alerts, and NOAA storm reports for your area on the date of the event
This documentation forms the foundation of your insurance claim. Our roof inspection for insurance claims guide provides even more detail on what adjusters look for during their assessment. For an overview of common signs you need a new roof, that guide complements the inspection process.
The Storm Damage Insurance Claim Process: Step by Step
Filing a storm damage roof claim is not complicated, but it requires organization and persistence. Here is the complete process from initial filing through final payment, based on hundreds of claims I have helped homeowners navigate.
Step 1: Review Your Policy Before Filing
Before you call your insurer, find your homeowner's insurance policy and review:
- Your deductible: Is it a flat dollar amount or a percentage-based deductible (common for wind/hail in storm-prone areas)?
- Coverage type: Replacement Cost Value (RCV) pays to replace your roof at current prices. Actual Cash Value (ACV) pays the depreciated value. RCV is far better for homeowners
- Named storm or wind/hail deductible: Many policies have a separate, higher deductible specifically for hurricane or wind/hail damage
- Filing deadline: Policies specify how long you have to report damage. Some states have additional statute-of-limitations rules
- Exclusions: Know what is not covered (typically flood damage, neglected maintenance, wear and tear)
Understanding these details before filing prevents surprises and helps you have an informed conversation with your insurer. For more on coverage types, see our guide on whether insurance covers roof leaks.
Step 2: File Your Claim Promptly
Call your insurance company's claims line (not your agent's personal line) and file a claim. During this call:
- Provide a factual description of the storm event and observed damage
- Request your claim number and the name of your assigned adjuster
- Ask about the expected timeline for adjuster inspection
- Do not agree to any settlement or scope during this initial call
- Do not speculate about the cause of damage -- stick to facts
Step 3: Prepare for the Adjuster Visit
The insurance adjuster's inspection is the single most important event in your claim. Here is how to prepare:
- Have your contractor present -- a knowledgeable contractor can point out damage the adjuster might miss and explain the scope of repairs needed
- Provide your documentation -- photos, videos, and any written damage assessments from contractors
- Clear debris from the area (after documenting it) so the adjuster can access the roof safely
- Be present during the inspection -- ask questions, take notes, and understand what the adjuster is documenting
- Get a copy of the adjuster's report before they leave if possible, or request it promptly after
Step 4: Get an Independent Contractor Estimate
If you have not already, get a detailed, line-item estimate from a licensed roofing contractor. This estimate should include:
- Complete scope of work with specific materials, quantities, and methods
- Documentation of all damage found, including damage the adjuster may have missed
- Photos supporting each line item
- Code compliance requirements that may not be in the adjuster's scope
Step 5: Review the Adjuster's Report and Initial Payout
Compare the adjuster's report line by line against your contractor's estimate. Common gaps include:
- Missing damage: Items the adjuster did not identify
- Underscoped repairs: Smaller repair scope than what is actually needed
- Missing code upgrades: Current building code requirements not included
- Insufficient quantities: Wrong measurements or material quantities
Step 6: Negotiate if the Payout Is Too Low
If the adjuster's estimate falls significantly short of your contractor's estimate, you have several options:
- File a supplement: Your contractor submits additional documentation of damage or scope items that were missed
- Request a re-inspection: Ask the insurer to send a different adjuster for a second look
- Hire a public adjuster: An independent adjuster who works for you (not the insurance company) to negotiate your claim
- File a complaint with your state's Department of Insurance if you believe the claim is being handled in bad faith
Our guide to handling lowball insurance claims provides detailed negotiation strategies. Understanding how roof age affects insurance coverage is also critical if your roof is 15 years old or older.
Step 7: Approve Repairs and Track Supplements
Once you and your insurer agree on the scope, approve the contractor to begin repairs. During the repair process, additional hidden damage is often discovered (especially damaged decking hidden under shingles). Your contractor should:
- Document all hidden damage with photos as it is uncovered
- File a supplement claim with the insurance company for the additional work
- Get approval before proceeding with supplement repairs when possible
- Keep you informed at every step
Step 8: Final Inspection and Closeout
After repairs are complete, conduct a final walkthrough with your contractor. Verify that all damage has been addressed, that the workmanship meets standards, and that you have received all warranty documentation. Some insurance companies require a final inspection before releasing the final payment (especially on RCV policies where the recoverable depreciation is held back until work is completed).
Repair vs. Replacement: How to Decide
One of the most important decisions after storm damage is whether your roof needs spot repairs or full replacement. This decision should be based on facts -- not on what the insurance company prefers to pay for, and not on what a contractor wants to sell you.
When Repair Is Sufficient
- Damage is localized to one area or one slope of the roof
- Less than 30 percent of the roof surface is affected
- The roof is less than 10 years old with matching materials available
- The roof structure (decking, rafters, trusses) is intact
- Matching shingles or materials can be sourced
- The damage is limited to surface materials (shingles, flashing, vent boots)
When Replacement Is Necessary
- Damage covers more than 30 percent of the roof surface
- The roof is 15 years old or older and the storm accelerated existing deterioration
- Structural damage to decking, rafters, or trusses
- Multiple previous repairs that complicate another patch job
- Building code requirements mandate a full tear-off and re-installation
- Matching materials are unavailable (discontinued shingle lines)
- The insurance payout covers replacement and the roof was near end of life anyway
| Factor | Favors Repair | Favors Replacement |
|---|---|---|
| Roof Age | Under 10 years | Over 15 years |
| Damage Extent | Less than 30% of surface | More than 30% of surface |
| Structural Damage | None -- surface only | Decking, rafters, or trusses affected |
| Material Availability | Matching materials available | Materials discontinued or unavailable |
| Previous Repairs | No prior patches | Multiple previous repairs |
| Code Compliance | Current code allows repair | Code requires full tear-off |
| Insurance Coverage | Payout covers repair only | Payout covers replacement |
For a deeper analysis of the repair vs. replacement decision, see our complete guide to deciding between roof repair and replacement. If you are noticing signs of aging beyond the storm damage, our guide on whether to replace a roof that is not leaking addresses that common question.
The Storm Damage Repair Process: What to Expect
Understanding the repair process from start to finish helps you set realistic expectations and recognize when something is not going right. Here is what a legitimate, professional storm damage repair looks like.
Phase 1: Professional Inspection and Damage Assessment
A thorough inspection by a licensed contractor involves:
- Complete roof access inspection (on the roof, not just from the ground)
- Documentation of all damage with photos and measurements
- Assessment of the underlying structure (decking, flashing, ventilation)
- Written report with findings and recommended scope of work
- Line-item estimate for the insurance company
Phase 2: Scope of Work and Contract
Before any work begins, you should receive a detailed written scope of work that includes:
- Specific materials to be used (brand, product line, color)
- All work to be performed, including code-required upgrades
- Timeline for completion
- Payment schedule tied to milestones (never full payment upfront)
- Warranty terms for both materials and workmanship
- Permit information (if required -- and it usually is)
Phase 3: Emergency Temporary Repairs (Tarping)
If there is active water intrusion, temporary repairs should be performed immediately -- before permanent repairs are scheduled. Proper emergency tarping is more than just throwing a blue tarp on the roof.
Proper Tarping Methodology
- Use heavy-duty tarps: Minimum 10-mil poly tarps. Thin tarps tear in wind and make the situation worse
- Extend past the ridge: The tarp must extend over the ridge line and down at least four feet on the opposite side. Water follows the path of least resistance, and a tarp that stops short of the ridge allows wind-driven rain to enter above it
- Secure with furring strips: Screw 1x3 or 2x4 lumber strips through the tarp into the roof decking (not into shingles). Weight alone is not sufficient -- tarps secured with sandbags or bricks blow off in the first gust
- Extend past the eave: The tarp should extend past the eave line so water drains off the roof, not under the tarp
- Create water channels: Ensure the tarp is taut with no low spots where water can pool. Pooling water adds weight and eventually tears through
- Document the temporary repair: Your insurance company covers reasonable temporary repair costs. Photograph the tarp installation and keep the receipt
Phase 4: Permanent Repair
The permanent repair process varies based on the type and extent of damage, but generally includes:
- Material delivery and staging -- materials should arrive before the crew starts
- Removal of damaged materials -- old shingles, damaged flashing, compromised decking
- Structural repairs -- replacement of damaged decking, rafters, or trusses
- Underlayment installation -- ice and water shield in vulnerable areas, synthetic underlayment elsewhere
- New material installation -- shingles, metal panels, or other roofing materials per the approved scope
- Flashing and penetration sealing -- all chimney, vent, skylight, and wall flashing replaced or resealed
- Ridge vent and ventilation -- proper attic ventilation restored or upgraded
- Cleanup and debris removal -- magnetic sweep for nails, debris hauled away
Phase 5: Quality Verification and Final Walkthrough
- Walk the property with your contractor after repairs are complete
- Verify all damaged areas have been addressed
- Check that flashing, vents, and penetrations are properly sealed
- Confirm cleanup is complete (check for nails in the yard and driveway)
- Obtain warranty documentation for both materials and labor
- Get copies of any permits and passed inspections
Repair Timeline Expectations
| Repair Type | Typical Timeline | Factors That Extend |
|---|---|---|
| Emergency tarping | Same day to 48 hours | Widespread storm event with high demand |
| Minor repairs (few shingles) | 1 to 3 days after materials and insurance approval | Material availability, weather delays |
| Moderate repair (section of roof) | 3 to 7 days | Hidden damage, structural repairs needed |
| Full replacement | 1 to 3 days on the roof (plus scheduling lead time) | Roof complexity, size, weather, permit delays |
| Insurance claim timeline (filing to final payment) | 4 to 12 weeks | Supplements, re-inspections, disputes |
After major storm events (hurricanes, large-scale hailstorms), demand for roofing contractors surges dramatically. In these situations, the wait for repairs can extend to weeks or months. This is when storm chasers flood the area -- and why the next section is critically important.
How to Choose a Contractor and Avoid Storm Chasers
After every major storm event, a wave of out-of-state contractors descends on the affected area. The roofing industry calls them "storm chasers" -- companies or individuals who follow severe weather patterns, solicit homeowners aggressively, do the work (sometimes poorly), and move on to the next disaster zone before the problems surface.
Storm chasers are, in my experience, the single biggest threat to homeowners after a storm. More than the damage itself. Because the storm damage can be repaired. But money lost to a storm chaser, or a bad repair that fails six months later after the contractor has moved to another state, is nearly impossible to recover.
Red Flags: How to Identify Storm Chasers
Storm Chaser Warning Signs
- Door-to-door solicitation immediately after a storm. Legitimate local contractors have existing customer bases and referrals. They do not need to canvass neighborhoods
- "We will pay your deductible" or "Free roof." This is insurance fraud. Your deductible is your legal obligation. A contractor who offers to waive it is committing fraud and involving you in it
- Pressure to sign a contract immediately. "This offer is only good today" or "We only have a few spots left" are high-pressure sales tactics, not legitimate business practices
- Out-of-state license plates on their trucks. Check where they are actually based, not where they claim to be based
- No local physical address. A P.O. box or a hotel room is not a business address. Verify they have a permanent local office
- They want to inspect your roof before you have called your insurance company. Legitimate contractors work alongside the insurance process, not before or instead of it
- They ask you to sign an Assignment of Benefits (AOB) or a contract that gives them power of attorney over your insurance claim. This transfers your claim rights to them and removes your control
- They require large upfront deposits. Industry standard is zero to one-third upfront, with the balance due at completion or tied to milestones
- Their "company" was recently formed. Check state business records for incorporation date. Storm chasers frequently create new LLCs in the disaster area
What Legitimate Contractors Look Like
- Established local presence -- they have been in the community for years, with a verifiable address, phone number, and history
- Proper licensing and insurance -- licensed in your state (and city/county if required), with general liability insurance and workers' compensation coverage. Ask to see current certificates
- Manufacturer certifications -- credentials from GAF, Owens Corning, CertainTeed, or other major manufacturers indicate training and quality commitment
- Verifiable references and reviews -- Google reviews, BBB rating, references from recent customers you can actually call
- Detailed written estimates -- line-item estimates that specify materials, quantities, methods, and timelines, not vague one-paragraph proposals
- Transparent payment terms -- payment tied to project milestones, final payment due after completion and your approval
- Warranty documentation -- both manufacturer material warranties and their own workmanship warranty, in writing
- Will work with your insurance company -- not trying to replace or bypass the insurance process
Questions to Ask Any Storm Damage Contractor
- How long have you been in business at your current location?
- Can I see your state contractor's license and current insurance certificates?
- Are your workers employees or subcontractors? Do they have workers' compensation coverage?
- Do you have manufacturer certifications? From which manufacturers?
- Can you provide references from storm damage repairs completed in the last 12 months?
- Will you provide a detailed written estimate with line items?
- What are your payment terms? Is there an upfront deposit required?
- Will you handle the insurance supplement process if hidden damage is found?
- What is your workmanship warranty, and who do I call if there is a problem in two years?
- Will you pull the required permits for the work?
For more on why working with a local company matters, read our article on why choosing a locally owned roofing company matters. We also cover the important issue of what homeowners should know about private equity-owned roofing companies -- some storm chasers are backed by large investment firms that prioritize volume over quality.
Storm Damage Risks by Region
Storm damage to roofs is not a one-size-fits-all problem. The type of storm damage you are most likely to face -- and the materials and building methods that best protect against it -- depend heavily on where you live. Here is a regional breakdown of the primary storm damage risks across the United States.
Hurricane and Coastal Zones (Southeast, Gulf Coast, Atlantic Coast)
Primary risks: Sustained high winds (75+ mph), wind-driven rain, flying debris, storm surge (for low-lying coastal areas)
States most affected: Florida, Texas, Louisiana, Mississippi, Alabama, Georgia, South Carolina, North Carolina, Virginia
Building code focus: High-velocity wind zones require enhanced roof-to-wall connections (hurricane straps or clips), rated underlayment, and specific nailing patterns. Miami-Dade County has the most stringent wind-resistance requirements in the country and serves as the benchmark for coastal building codes.
Best protection: Standing seam metal roofing, impact-resistant shingles rated for high winds, and the IBHS FORTIFIED Roof standard (discussed in the next section). In my experience working in coastal South Carolina, I have seen the difference between a standard roof installation and a FORTIFIED installation after a hurricane -- it is dramatic. For coastal-specific advice, see our Myrtle Beach storm damage repair guide and our best roofing materials for hurricane season article.
Tornado Alley (Central United States)
Primary risks: Extreme wind speeds (up to 300+ mph in strongest tornadoes), rapid pressure changes, massive debris impact
States most affected: Texas, Oklahoma, Kansas, Nebraska, South Dakota, Iowa, Missouri, Arkansas, Illinois, Indiana
Building code focus: Safe rooms and storm shelters. While no residential roof can withstand a direct hit from a strong tornado (EF3+), proper construction techniques significantly reduce damage from weaker tornadoes and the peripheral winds of stronger ones. The ICC 500 Standard for storm shelters and the FEMA P-320 safe room guidelines are the key references.
Best protection: Impact-resistant shingles (Class 4), six-nail installation patterns, enhanced roof-to-wall connections. For the roof itself, survivability in Tornado Alley is about the connections and fastening more than the surface material.
Hail Belt (Central Plains to Upper Midwest)
Primary risks: Hail from marble-size to softball-size, often accompanied by high winds
States most affected: Colorado, Wyoming, Nebraska, South Dakota, North Dakota, Minnesota, Iowa, Kansas, Oklahoma, Texas (north-central)
Building code focus: Many jurisdictions in hail-prone areas have adopted or incentivize Class 4 impact-resistant shingles. Some insurance companies in these states offer premium discounts of 10 to 35 percent for Class 4 rated roofing.
Best protection: Class 4 impact-resistant shingles (rated under UL 2218 to withstand a two-inch steel ball dropped from 20 feet), metal roofing with documented hail ratings, and synthetic underlayment that provides a secondary water barrier if the surface material is compromised.
Ice Dam Regions (Northern United States)
Primary risks: Ice dam formation, heavy snow load, freeze-thaw cycling
States most affected: Minnesota, Wisconsin, Michigan, New York, Vermont, New Hampshire, Maine, Massachusetts, Connecticut, Montana
Building code focus: IRC requires ice barrier membrane (ice and water shield) from the eave edge to at least 24 inches past the interior wall line in areas where the average January temperature is 25 degrees F or below. Many local codes require more extensive coverage.
Best protection: Proper attic insulation and ventilation (this is the root cause solution -- ice dams form when heat escapes through the roof and melts snow, which refreezes at the eave), ice and water shield membrane extending well past the wall line, metal roofing (snow slides off rather than accumulating), and heated cable systems as a last resort.
High-Wind Corridors (Mountain and Great Plains)
Primary risks: Sustained high winds (Chinook winds, downslope windstorms), gusts exceeding 100 mph even without thunderstorms or tornadoes
States most affected: Colorado (Front Range), Wyoming, Montana, Utah, New Mexico
Best protection: High-wind-rated shingles (Class H or Class G per ASTM D7158), six-nail installation, sealed roof decking, and enhanced flashing at all penetrations. In these areas, the consistent high wind exposure degrades standard roofing materials faster than normal, shortening roof lifespan even without a single major storm event.
Material Upgrades for Storm-Prone Areas
If you are replacing a storm-damaged roof, this is your opportunity to upgrade to materials that will perform better in the next storm. Storm damage repairs are one of the few times insurance may cover the cost of better materials -- especially when building code changes since the original installation require them.
Impact-Resistant Shingles (Class 4, UL 2218)
Class 4 impact-resistant shingles are tested by dropping a two-inch steel ball from 20 feet onto the shingle. To earn the Class 4 rating, the shingle must show no cracking of the mat, no tearing, and no rupture of the waterproof membrane.
- Why they matter: They resist hail damage that destroys standard shingles
- Cost premium: Typically a modest premium over standard architectural shingles
- Insurance benefit: Many insurers offer 10 to 35 percent premium discounts for Class 4 shingles. Over time, the premium discount can offset the higher material cost
- Top-rated products: Look for shingles tested and certified under UL 2218 and FM 4473 standards
Metal Roofing for Hurricane and Wind Zones
Standing seam metal roofing is the best-performing material in high-wind environments. The concealed fastener system and interlocking panels create a continuous surface that resists uplift forces far better than individual shingle tabs.
- Wind resistance: Standing seam metal roofs rated for 140 to 180+ mph winds are widely available
- Hail resistance: Metal dents but does not lose waterproofing integrity the way asphalt shingles do when granules are displaced
- Lifespan: 40 to 70 years depending on the metal type and coating, versus 20 to 30 years for standard asphalt
- Weight: Metal is lighter than asphalt, reducing structural load and making it suitable for re-roofing over existing materials where code allows
For a detailed comparison, see our metal roofing pros and cons guide and our article on the best metal roofing materials for hurricane zones.
Underlayment Selection
The underlayment is your roof's second line of defense. When surface materials fail in a storm, the underlayment is what stands between the elements and your home's interior.
- Synthetic underlayment has largely replaced traditional felt paper. It is stronger, lighter, more water-resistant, and does not wrinkle or tear as easily
- Ice and water shield (self-adhering membrane) should be used at all vulnerable points: valleys, eaves, around penetrations, and at roof-to-wall transitions. In storm-prone areas, many contractors recommend full-deck ice and water shield for maximum protection
- Code requirements vary by region -- hurricane zones and ice dam areas have specific underlayment requirements that exceed minimum national code
The FORTIFIED Roof Standard (IBHS)
The Insurance Institute for Business and Home Safety (IBHS) created the FORTIFIED Home program, which includes three levels of resilience designation: FORTIFIED Roof, FORTIFIED Silver, and FORTIFIED Gold.
The FORTIFIED Roof designation focuses specifically on the roof system and includes:
- Sealed roof deck -- all joints and seams in the decking sealed with code-plus tape or membrane
- Enhanced attic ventilation -- vents designed to resist wind-driven rain entry
- Drip edge at all eaves and rakes -- prevents wind uplift at roof edges
- Proper starter strips and ridge cap installation
- Impact-rated materials in hail-prone areas
Why it matters: IBHS testing has shown that FORTIFIED-designated roofs significantly outperform standard roofs in severe weather. Several states (including Alabama, Mississippi, South Carolina, and Louisiana) offer insurance premium discounts or grant programs for FORTIFIED certification. In South Carolina, the SC Safe Home Program provides grants to help homeowners upgrade to FORTIFIED standards.
Preventing Future Storm Damage
You cannot prevent storms. But you can prepare your roof to withstand them better. Proactive maintenance and preparation reduce storm damage severity, lower insurance claims frequency, and extend the life of your roofing system.
Annual Professional Inspections
Have a licensed roofing contractor inspect your roof at least once a year -- ideally in spring (to catch winter damage) and again before storm season in your area. A professional inspection catches issues that lead to storm damage:
- Loose or lifted shingles that will blow off in the next windstorm
- Deteriorated flashing that will leak under wind-driven rain
- Blocked drainage that causes water pooling and ice dam formation
- Structural issues that compromise wind resistance
- Sealant failures at penetrations
Seasonal Maintenance Checklist
| Season | Maintenance Tasks |
|---|---|
| Spring | Professional inspection, clean gutters, check for winter damage, trim overhanging branches, inspect attic for moisture or mold, check vent screens and seals |
| Summer / Pre-Storm Season | Verify insurance coverage and deductible, photograph the roof condition for baseline documentation, secure loose items in the yard that could become projectiles, ensure emergency tarps and supplies are accessible, clear gutters again if trees shed flowers or seeds |
| Fall | Clean gutters and downspouts (leaf season), check for loose shingles or flashing before winter, inspect attic insulation and ventilation (critical for ice dam prevention), trim any tree branches within 10 feet of the roof |
| Winter | Monitor for ice dam formation, remove heavy snow accumulation safely (from the ground using a roof rake, never by climbing onto the roof), check for leaks after freeze-thaw cycles, keep gutters clear |
Tree Management
Trees are one of the most common sources of storm damage to roofs. Proactive tree management significantly reduces your risk:
- Maintain a 10-foot clearance between tree branches and the roof surface
- Remove dead or dying trees near the home before they fall in a storm
- Thin dense canopies to reduce wind resistance (trees with thinned canopies are less likely to topple in high winds)
- Hire a certified arborist for evaluation and major tree work -- improper trimming can make trees more vulnerable to wind damage, not less
Gutter and Drainage Maintenance
- Clean gutters at least twice per year (spring and fall), more often if surrounded by trees
- Ensure downspouts direct water at least four to six feet away from the foundation
- Install gutter guards if debris accumulation is a recurring problem
- Check that all gutter sections are securely fastened -- loose gutters pull away in windstorms and create additional damage
Frequently Asked Questions About Storm Damage Roof Repair
These are the questions I hear most frequently from homeowners dealing with storm damage. Each answer reflects what I have seen in 15 years of storm damage repair work.
The Cost Comparison: Maintenance vs. Neglect
Without Maintenance
- Roof lifespan: 12-15 years
- Insurance claims often denied
- Emergency repairs cost 3x more
- Property value decreases by 5-10%
- Warranty becomes void
- Total 20-year cost: $382
With Regular Maintenance
- Roof lifespan: 25-30+ years
- Insurance claims approved
- Prevent costly emergencies
- Property value protected
- Full warranty coverage maintained
- Total 20-year cost: $8,000-10,000
Need a roofer?
Call (843) 877-5539 for a free estimateNeed Professional Help?
WeatherShield Roofing is Myrtle Beach's highest-rated roofing company with a perfect 5.0-star Google rating. We can help with any roofing need:
Frequently Asked Questions
About the Author
David Karimi
Owner, WeatherShield Roofing
David Karimi is the owner of WeatherShield Roofing, with extensive experience repairing storm-damaged roofs across the Grand Strand region of South Carolina. He has managed thousands of storm damage claims and specializes in hurricane, wind, and hail damage restoration. David is committed to helping homeowners navigate the post-storm repair process with honesty and expertise.
The Bottom Line: Your Roof, Your Choice
Every day you wait is another day closer to that emergency call no homeowner wants to make. The statistics are clear: 80% of roofs fail prematurely, and 61% of homeowners can't afford the emergency repairs that follow.
What You Get with Weather Shield Roofing:
Don't Wait Until It's Too Late
Join thousands of smart Myrtle Beach homeowners who protect their investment with regular maintenance.
Emergency? Call our 24/7 hotline: (843) 877-5539
Our Roofing Services
Serving the Grand Strand
Weather Shield Roofing proudly serves homeowners across the Grand Strand and surrounding communities. Find your local roofing experts:
Related Articles

Hurricane Roof Damage in Myrtle Beach: What to Do First (2026 Guide)
Hurricane roof damage in Myrtle Beach? Step-by-step guide: emergency tarping, SC insurance claims, damage by hurricane category, storm chaser warnings & when to call a roofer. Call (843) 877-5539.
Storm Damage Roof Repair in Myrtle Beach: Complete 2026 Guide
Expert guide to storm damage roof repair in Myrtle Beach, SC. Learn what to do after hurricane, hail, or wind damage. 5.0-rated contractor. Call (843) 877-5539.

Wind Damaged Roof: How to Identify, Document & Repair Wind Damage (2025)
How to identify wind damage on your roof: signs of lifted shingles, exposed decking, and structural damage. Learn documentation for insurance claims, repair vs replacement decisions, costs, and what wind speeds cause roof damage. Expert guide.